GET STARTEDQUICK START
Quick start
This guide gives a Chaos vehicle dents, paint wear and dirt. You wire three material functions into the body and wheel materials, then add one component to the vehicle. No code is needed.
You need:
- The plugin installed. See Installation.
- A pawn based on
AWheeledVehiclePawnwith aUChaosWheeledVehicleMovementComponent. - Wheels that are mesh components on the wheel bones. A wheel that is only a bone gets no tyre deformation and no wheel dirt.
- A vehicle with none of this set up yet: no Crushform adapter and no wired materials.
- Unreal Engine 5.6, 5.7 or 5.8.
The screenshots in this guide show the plugin’s sedan, BP_VehicleAdvSedan, set up step by step from scratch. Follow the steps on your own vehicle. The finished sedan is in the plugin at /Crushform/Blueprints/Sedan/BP_VehicleAdvSedan, to compare with.
1. Wire the body material
Section titled “1. Wire the body material”- Open the master material of the paint, the parent of its instances.
- Add
MF_CF_DeformandMF_CF_Paint. Right-click the graph and search for each name. - Check these on your material before you connect anything:
- Your own World Position Offset stays. Add it to the World Position Offset of
MF_CF_Deformwith an Add node, and drive the sum into the material’s World Position Offset. - A normal map or other normal source goes into the Normal input of
MF_CF_Deform, not into the material. - A material that uses Material Attributes is wired through Break Material Attributes and Set Material Attributes nodes. The Break Material Attributes outputs feed the inputs of the two functions and the Add node. The outputs of
MF_CF_Deform(Normal, and the sum of the offsets) and ofMF_CF_Paint(Base Color, Roughness, Metallic) go into the matching pins of Set Material Attributes, which feeds the material. - The material must use Tangent Space Normal. A world-space normal does not wire.
- Glass and interior parts that share the body’s mesh get only
MF_CF_Deform. They dent with the body and keep their own look. - Every material of every mesh that should bend needs this wiring. Put parts that move relative to the body, such as doors and the steering wheel, in the profile’s Exclude Tags.
- A material can use at most two parameter collections.
MF_CF_Paintuses one of them, so a material that already uses two does not compile once wired. - Every material that uses the wired functions pays for the vertex work, dented or not.
- Your own World Position Offset stays. Add it to the World Position Offset of
- Make these ten connections, one row each. The Scratch row is optional: without it the paint wears, but a scrape draws no lines. Note first what feeds the material’s Base Color, Roughness and Metallic now.
| From | To |
|---|---|
| Your base colour | Base Color of MF_CF_Paint |
| Your roughness | Roughness of MF_CF_Paint |
| Your metallic | Metallic of MF_CF_Paint |
Wear Depth of MF_CF_Deform | Wear Depth of MF_CF_Paint |
Scratch of MF_CF_Deform | Scratch of MF_CF_Paint |
Base Color of MF_CF_Paint | Base Color of the material |
Roughness of MF_CF_Paint | Roughness of the material |
Metallic of MF_CF_Paint | Metallic of the material |
World Position Offset of MF_CF_Deform | World Position Offset of the material |
Normal of MF_CF_Deform | Normal of the material |
- In the material’s Details, under Usage, switch on Used with Skeletal Mesh if the body is a skeletal mesh.
- In the material’s Details, set Max World Position Offset Displacement (in the World Position Offset category) to the Max Displacement of the profile the vehicle uses, plus the Fold Amplitude input of
MF_CF_Deform. The fold amplitude is 3 cm by default. If the material already has a bound of its own, add the same sum to that bound instead. - Click Apply, then Save.
2. Wire the wheel material
Section titled “2. Wire the wheel material”- Open the wheel material. Put
MF_CF_WheelDirtbetween the wheel’s colour and Base Color, Roughness and Metallic. The wheel’s colour, roughness and metallic go into its inputs of the same names, and its three outputs drive the three properties. - Do not add
MF_CF_DeformorMF_CF_Paintto a wheel material. A wheel’s Custom Primitive Data holds its dirt, not the body’s dent data. - The tyre bulge is a separate function,
MF_CF_TireDeform, and its wiring is not part of this guide. Keep Always Evaluate WPO off in a tyre material. - The plugin’s ready example is
M_CF_Wheel. Open it to compare.
3. Add the adapter
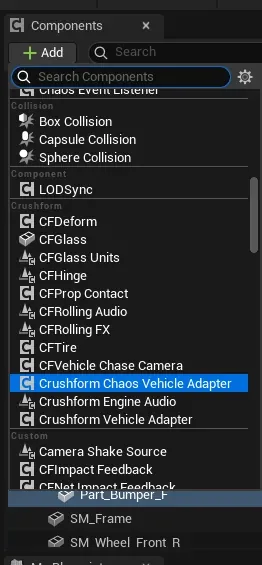
Section titled “3. Add the adapter”- Open the vehicle’s Blueprint. Click Add and choose Crushform Chaos Vehicle Adapter. It is in the Crushform category. Do not pick Crushform Vehicle Adapter: that one needs its wheels listed by hand.
- Click Compile, then Save.
-
The adapter creates its components on every machine, under fixed names. Each one has its own switch:
CF_Deformmakes the dents and dirt of the body. It needs Dirt and Dents.CF_Glassmakes the glass panes. It needs Glass and Dirt and Dents.CF_Tiresmakes the tyre deformation. It needs Tires.CF_RollingAudioandCF_RollingFXmake the rolling sound and effects. They need Rolling Sound and Rolling FX.CF_EngineAudiomakes the engine sound. It needs Engine Sound, and the engine sound setting in Project Settings under Crushform Engine.CF_PropContactbreaks props. It needs Breaks Props.CF_ImpactFeedbackplays impact sounds and effects. It needs Impact Feedback.CF_PartImpactFeedbackdoes the same for the hinged parts, and also needs Dirt and Dents.
The adapter reads the wheels from the movement component, so you do not list them.
-
An empty Deform Profile takes the default in Project Settings, under Plugins, Crushform, Default Profile (
DA_CF_DefaultProfile). An empty Tire Profile takes the default in Project Settings, under Plugins, Crushform Tire, Default Profile.
| Crushform | ||
|---|---|---|
| Authority | ||
| Deform Profile | DA_CF_DefaultProfile | |
| Tire Profile | DA_CF_DefaultTireProfile | |
| Ram Allowance Mps | 15.0 m/s | |
| Features | ||
| Dirt and Dents | ||
| Glass | ||
| Tires | ||
| Rolling Sound | ||
| Rolling FX | ||
| Engine Sound | ||
| Impact Feedback | ||
| Breaks Props | ||
4. Give the ground a surface
Section titled “4. Give the ground a surface”- Dirt, rolling sound and rolling effects come from the ground’s physical material. Set the Phys Material of the ground’s material to one of the seven plugin materials:
PM_CF_Asphalt,PM_CF_Dirt,PM_CF_Grass,PM_CF_Mud,PM_CF_Swamp,PM_CF_SnoworPM_CF_Water. - A physical material with no row in the Surfaces table (
DA_CF_Surfaces) gets theDefaultrow. You can add rows for your own physical materials. - The rolling sound plays through the Attenuation of Project Settings, under Plugins, Crushform Wheels. It is
SA_CF_TireRollingby default. If it is cleared, the rolling sound stays off.
5. Play and crash
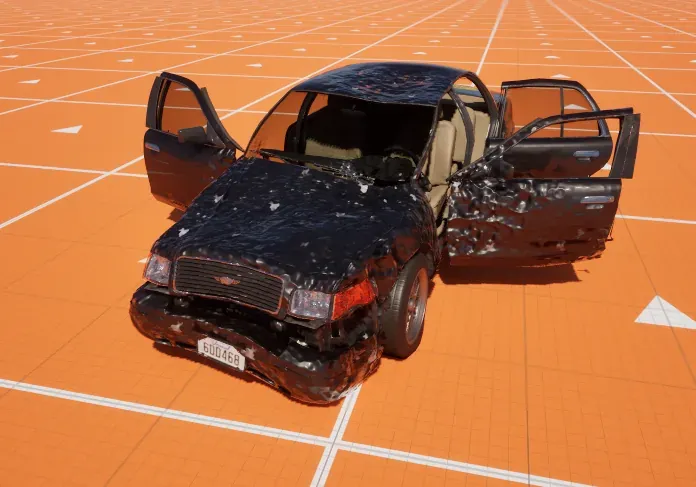
Section titled “5. Play and crash”- Press Play and drive the vehicle into a wall or a fence. The Proving Ground demo has fences to test on.
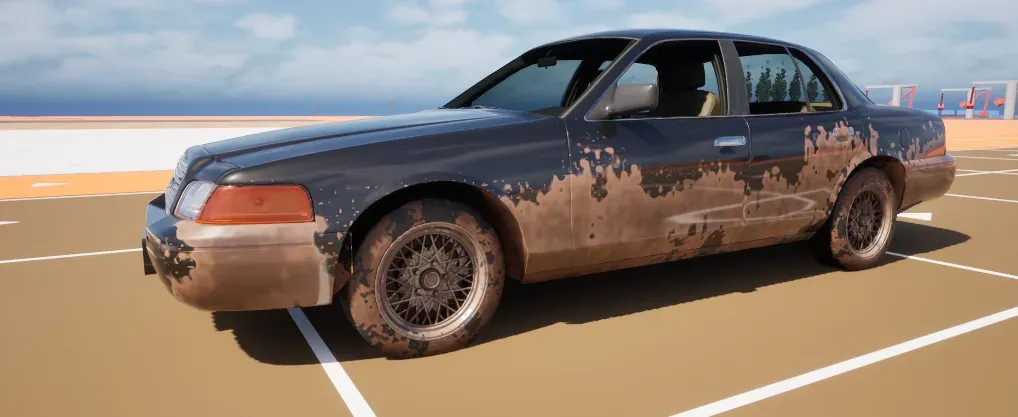
- Drive through mud on a
PM_CF_Mudsurface. The wheels and the lower body get dirty.
Key settings
Section titled “Key settings”These are on the adapter. The Chaos adapter inherits them from UCFVehicleAdapterComponent.
| Property | What it does |
|---|---|
UCFVehicleAdapterComponent::DeformProfile | The dents and dirt of the body. Empty: the project’s default profile. |
UCFVehicleAdapterComponent::TireProfile | The tyres. Empty: the project’s default tire profile. |
UCFVehicleAdapterComponent::Authority | Server (the default): the server simulates the vehicle and judges its hits. Owning Client: the machine that drives the vehicle simulates it and reports its hits, and the server checks them. |
UCFVehicleAdapterComponent::bDirtAndDents | The body dents and gets dirty. The glass panes and the wheels’ dirt need it. |
UCFVehicleAdapterComponent::bGlass | The glass panes on the vehicle crack and break. Needs Dirt and Dents. |
UCFVehicleAdapterComponent::bTires | The tyres deform on the wheel meshes. |
UCFVehicleAdapterComponent::bRollingSound | Each wheel plays its surface’s rolling sound. Presentation only: silent on a dedicated server. |
UCFVehicleAdapterComponent::bRollingFX | Each wheel shows its surface’s rolling effect. Presentation only. |
UCFVehicleAdapterComponent::bEngineSound | The engine plays its sound. Presentation only. Also needs the engine sound setting in Crushform Engine. |
UCFVehicleAdapterComponent::bImpactFeedback | Hits play impact sounds and effects on every machine. |
UCFVehicleAdapterComponent::bBreaksProps | The vehicle breaks the breakable props it drives into. |
Check that it works
Section titled “Check that it works”- Open the console with the tilde key and run
Crushform.Stats. The vehicle is in the list, with itshitscounter. The lines have this shape. Each vehicle line starts with the actor’s name, then whether this machine holds the lattice or a view of it:
Crushform atlas: N of M slots used, N waiting, N evictions, N uploads.Actor name: server lattice or client view, generation N, N pending, N chunks | hits N, sent N, accepted N, rejected N, ...- Run
Crushform.DebugImpact 15followed by part of the name of another vehicle with Crushform in the level. The name goes after the speed. It dents that vehicle from where you stand, up to 100 m away, with a speed change of 15 m/s, without driving. Without a name, it hits the damageable actor under the crosshair. It never hits the pawn you control, so check your own vehicle by driving into a wall, as in step 5. - Run
Crushform.Debug 1. It draws the dented lattice nodes of the bodies. - Drive through a
PM_CF_Mudsurface. The wheels and the lower body get dirty. - These commands work in the editor and in every build except Shipping, where they are compiled out.
If something is off
Section titled “If something is off”- Nothing dents: check the wiring in step 1, and check that the profile’s Exclude Tags do not hide the body mesh.
- The wheels stay clean: the wheels must be mesh components on the wheel bones.
- The ground gives no dirt or rolling sound: its Phys Material must be one of the plugin’s, or have a row in the Surfaces table.
- The material does not compile: check the two-collection limit in step 1.
More cases are in Troubleshooting.